How to Transfer or Share Files Free Between Host and Guest VMware

January 24, 2024

Are you looking for an easy way to transfer files between hosts and virtual machines? VMware provides you some ways to solve this problem easily and seamlessly. In this article, I will show you how to use these methods to easily transfer files between the virtual machine and the host. Here we go.
1. Related Terms
- Host
- Host means the computer on which VMware Workstation software is installed. In this article, I will use it to refer to the physical machine and its operating system.
- Guest
- In this article, the term 'guest' refers either to virtual machines created using VMware software, which utilizes virtualization technology, or to the operating system running on the virtual machine.
2. Solutions
You must install VMware-Tools on your virtual machines before using these ways to transfer files. If you encounter problems in the process of installing VMware-Tools, the guide on how to install VMware Tools on Linux, Windows, MacOS, FreeBSD, and Solaris may be helpful to you.
The demo environment for this post is Windows 10 running on the host, Ubuntu 22.04 installed on the virtual machine, and the version of VMware is VMware Workstation 17 Pro.
Note: If you are in other environments, you can also refer to. And remember choose what works for you at certain steps.
Way 1: Use copy and paste feature to transfer files
If you find that this feature doesn't work, please see if you have enabled it first.
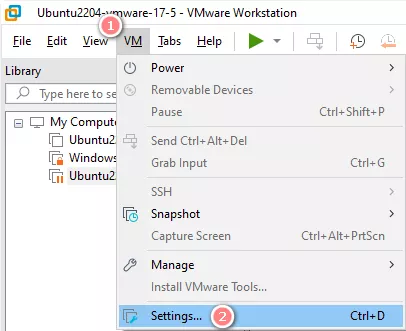
Step 1: Power off the virtual machine and open Virtual Machine Settings through VM -> Settings.
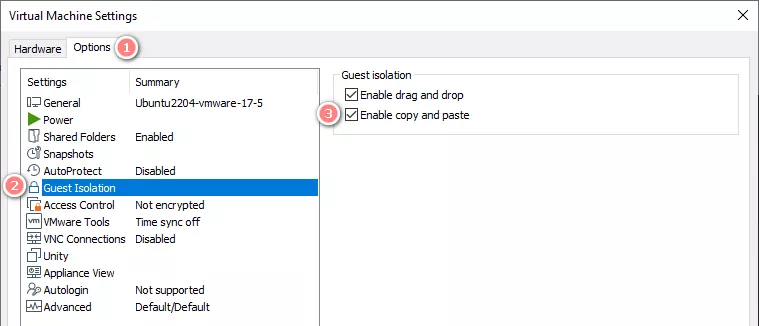
Step 2: Check whether "Enable copy and paste" option is selected by Options -> Guest Isolation
Step 3: Now you can transfer files between the virtual machine and the host as if you were copying and pasting files on one computer.
You can copy and paste text, images and other files you want to transfer by this way. It is the most convenient way to transfer files between host and guest.
Way 2: Use drag and drop feature to transfer files
By this way, you can also drag the file to corresponding application directly to open and edit it. And if you do this, remember to select Save As to save it in a specified location you can access. You can enable it by doing the same thing as enable copy and paste above.
But if your Ubuntu is after 17.10(Artful Aardvark), you may find the drag and drop feature doesn't work. The reason is Ubuntu started using the new window system Wayland as the default display server from version 17.10 (Artful Aardvark) but this feature is not yet supported by VMware.
You can still use the drag and drop feature in these Ubuntu versions by disabling the Wayland feature. And I will introduce how to disable it next. Let's take a look.
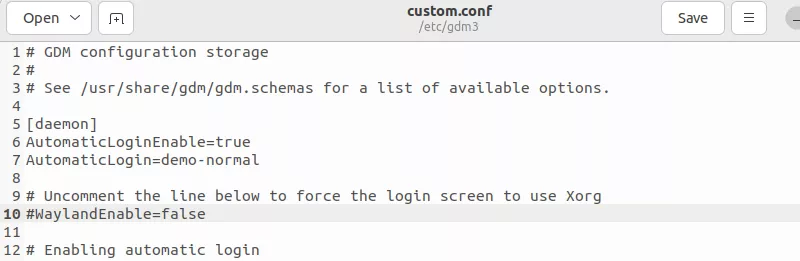
Step 1: Edit the configuration file for GNOME Display Manager 3 (GDM3) by running sudo gedit /etc/gdm3/custom.conf.
sudo gedit /etc/gdm3/custom.conf
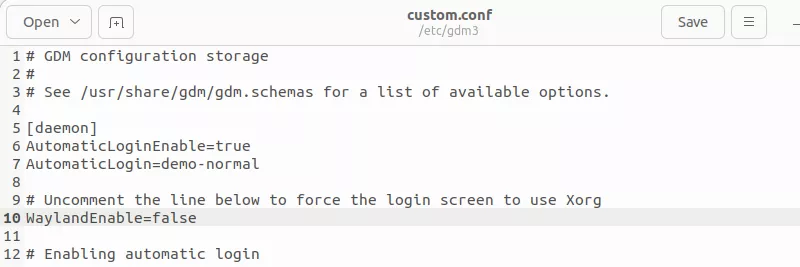
Step 2: In the file window, unlock the comments for #WaylandEnable=false on line 10.
Step 3: Save it by pressing "Ctrl + S".
Step 4: Reboot your virtual machine or running sudo systemctl restart gdm3 command.
sudo systemctl restart gdm3Step 5: If you use sudo systemctl restart gdm3 command previous step, it might reports an error and just ignore it.
Step 6: The drag and drop feature should be available now.
Way 3: Use shared folders feature to transfer files
The above methods will have two identical files in both the virtual machine and the physical machine, so this virtually increases the space occupancy. To solve this problem, you can choose to create shared folders. This way will solve the problem of useless space occupation to some extent. I will introduce it to you next.
This can be divided into two major steps, the first one is add shared folders in VMware and the second one is mount the shared folders in guest.
Step 1: Add shared folders in VMware
1.1 Select the virtual machine you want to share contents with.(The virtual machine can be turned on or off.)
1.2 Enable Shared Folders through Options -> Shared Folders in Virtual Machine Settings window.
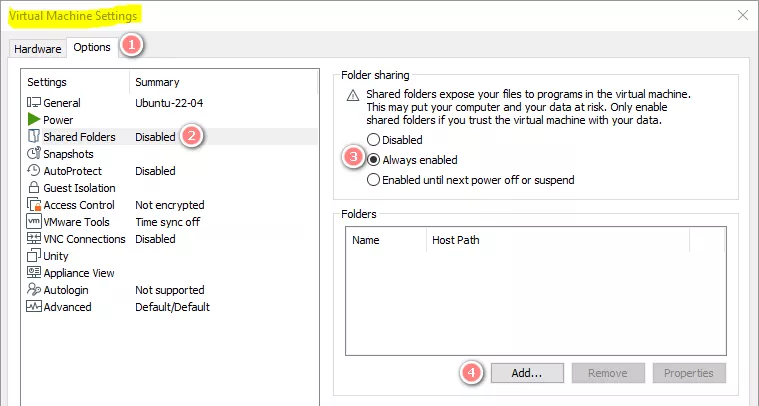
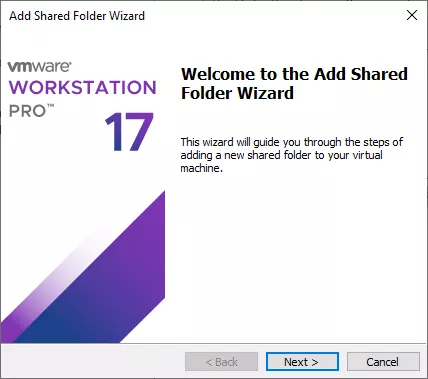
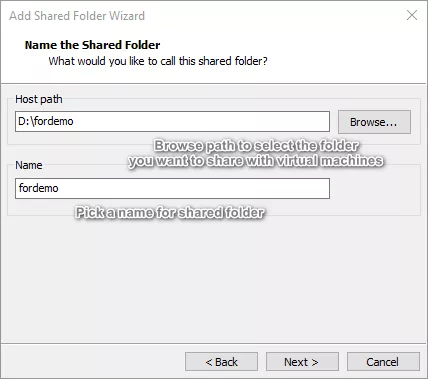
1.3 Click "Add" button to add a shared folder which you want to share with the Virtual machine. Complete the operation according the instructions of Add Shared Folder Wizard.
1.4 Remember the name you pick for the shared folder which will be used in the subsequent mount operation.
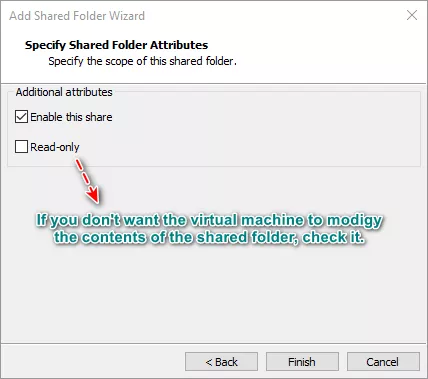
tip: If you don't want the contents of shared folders are modified by the virtual machine, you can specify the attributes of the shared folders as "Read-only".
1.5 The setup should look something like this.
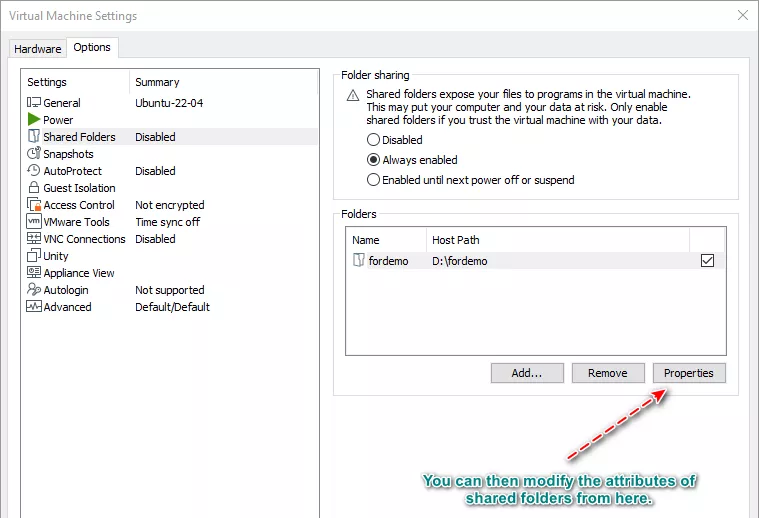
1.6 If you want to share more folders, repeat the steps from 1.3.
Step 2: Mount the shared folders in guest
Generally, the shared folders will be displayed in the /mnt/hgfs directory of the ubuntu virtual machine. But it will disappear when you reboot the virtual machine. So what do we do in this case? I will introduce how to mount it manually and how to set it to automatically mount on boot.
2.1 Mount operation will use the vmware-tools, so make sure you install it. You can run vmware-toolbox-cmd -v to check it. If the version number is displayed, it means you have installed the vmvare-tool, otherwise, install the vmware-tools first.
vmware-toolbox-cmd -v2.2 Mount it manually by running sudo vmhgfs-fuse -o allow_other -o auto_unmount .host:/fordemo /mnt/hgfs command. If you only need to use it once, That's all it takes. You will see the shared folder in the mount path you setted.
tip: Replace fordemo with your actual shared folder's name set in the 1.4 above. Use the actual path you want to mount the shared folder on to replace /mnt/hgfs path.
sudo vmhgfs-fuse -o allow_other -o auto_unmount .host:/fordemo /mnt/hgfs
2.3 If you need to use it for a long time, you can make it mounted automatically when virtual machine starts. I will introduce how to set it next.
2.4 Create the rc.local file by running sudo nano /etc/rc.local.
sudo nano /etc/rc.local
2.5 Type the follow contents in the editor window. (Don't forget to replace the shared folder name and mount path with your actual value). Press "Ctrl + X" to save changes and exit edit mode.
#!/bin/sh
sudo vmhgfs-fuse -o allow_other -o auto_unmount .host:/fordemo /mnt/hgfs
exit 0
2.6 Set the file to an executable file by running sudo chmod +x /etc/rc.local command.
sudo chmod +x /etc/rc.local
2.7 Congratulations, the shared folders will be displayed automatically when you reboot now.
3. Summary
In this article, we discuss how to use copy and paste, drag and drop, and create shared folders provided by VMware to transfer files between host and guest. Additionally, we address some common usage questions related to drag and drop functionality. While the copy and paste feature is my most recommended method due to its simplicity and efficiency, it's worth noting that other options, such as drag and drop and shared folders, are also effective for file transfer.
4. FAQs
- Q1: Where is the /mnt/hgfs location?
- You can find the /mnt/hgfs by click Other Locations -> Computer, and you will see the mnt directory here.

- Q2: Why can't I use it even after setting it up as described above?
- Check whether you have installed VMware Tools by running
vmware-toolbox-cmd -v. If it's not installed, please install it first. If you have already installed it, consider reinstalling it. Additionally, you can try installing Ubuntu updates.

![[Guest OS: Windows 10/Linux(Ubuntu)] How to Expand VM Disk Space in VMware Workstation](../img/computer/guest-os-windows-10-linux-ubuntu-how-to-expand-vm-disk-space-in-vmware-workstation/guest-os-windows-10-linux-ubuntu-how-to-expand-vm-disk-space-in-vmware-workstation-m.webp)


