3 Ways to Move WSL Distro to Another Drive

March 22, 2024

Where is the location of the WSL distribution? And how can I move a WSL distribution to another drive? If you have these questions, I can provide three ways to move a WSL distribution to another drive. Let's get started now.
Way 1: Move WSL Distro via Windows Settings
This method is very easy and beginner-friendly, making it extremely useful. If you don't need to customize the desired folder, this method is perfect for you. Let's take a look.
Step 1: Press "Windows logo key + i" simultaneously to evoke the Windows Settings window.
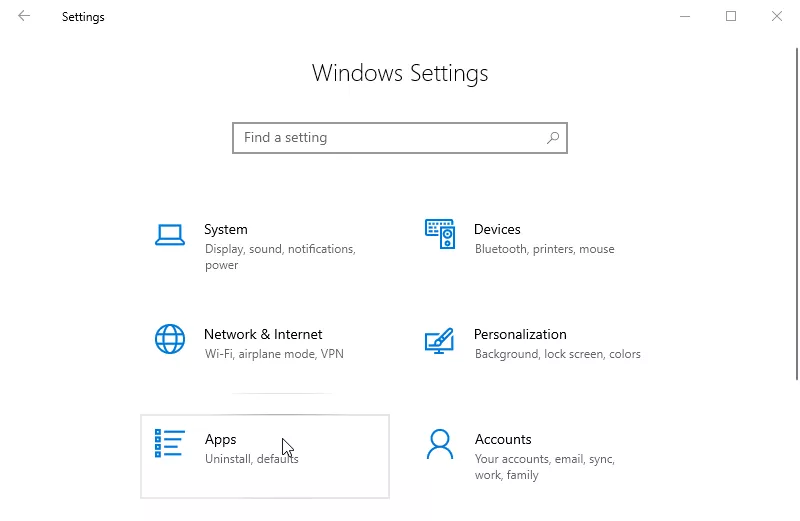
Step 2: Select "Apps" and type the name of the Linux distribution you installed (such as "Ubuntu") in the search bar on this page to find the corresponding WSL distribution.
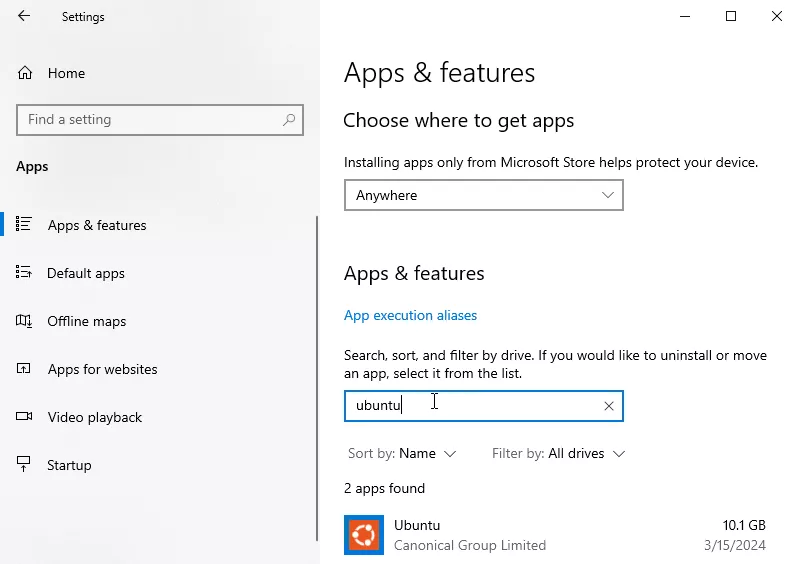
Step 3: Click on the item you want to move and select "Move" option.

Step 4: Choose a drive in the prompt window and click "Move".
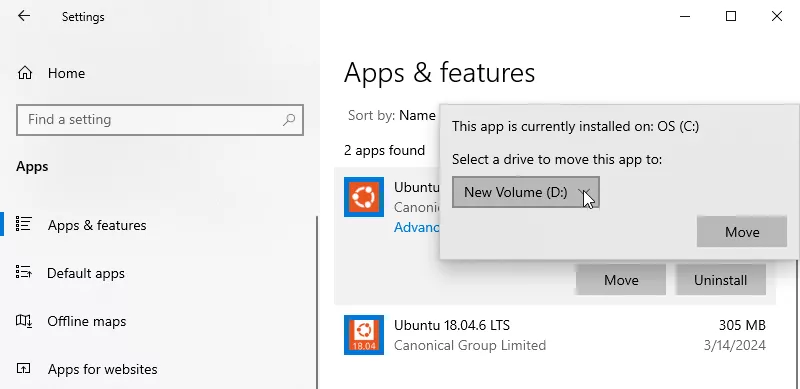
Step 5: Wait for the process to complete, and you will find the WSL distribution has been moved to D:\WpSystem\.
Note: "D" represents the Drive Letter you selected in step 4.
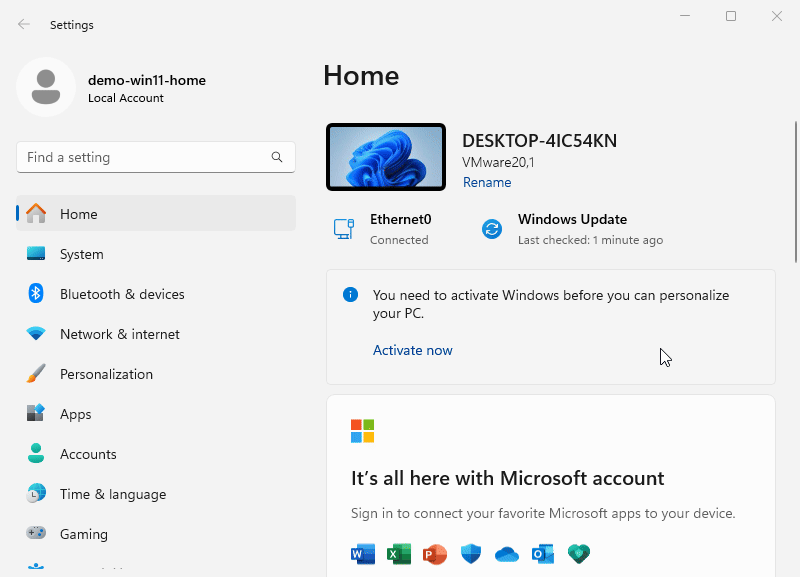
Step 6: The above steps demonstrate how to perform this task on Windows 10. The steps for Windows 11 are illustrated in the picture below.
Way 2: Move WSL Distro by Relocating the Installation Folder
You can customize your desired folder using this method, which functions similarly to moving the WSL distribution through Settings.
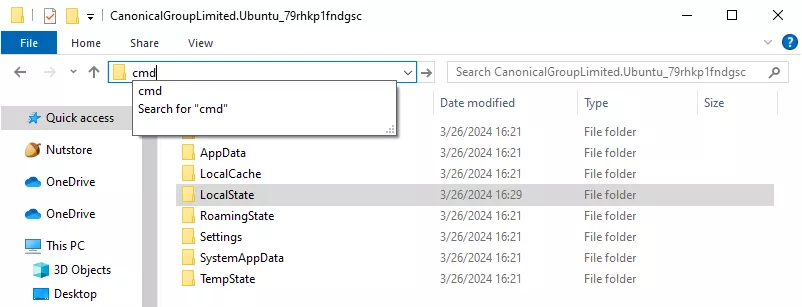
Step 1: Navigate to the installation folder.
Tips: The default installation location is C:\Users\username\AppData\Local\Packages\CanonicalGroupLimited.xxx, which stores all files related your WSL distribution. Replace "username" with your actual username. Alternatively, you can use %userprofile%\AppData\Local\Packages\.
Step 2: Type "cmd" in the address bar of File Explorer to open Command Prompt.
Step 3: Enter the command wsl --shutdown to close all WSL instances.
Step 4: Cut the "LocalState" folder from this directory and paste it into your desired location. In my case, the desired location is "D:\fordemo\WSL-distro\Ubuntu-latest".
Step 5: Use mklink /J LocalState D:\fordemo\WSL-distro\Ubuntu-latest\LocalState to create junction point.
Step 6: Type exit to close the Command Prompt.
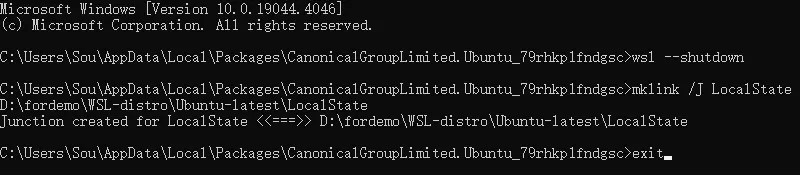
Step 7: The WSL distribution has now been moved to the D drive.
Way 3: Move WSL Distro Using Export and Import Feature
This method may be a bit more cumbersome, but if you're interested, you can give it a try. Furthermore, by using this approach, you can thoroughly move the WSL distribution from the system drive to the D drive.
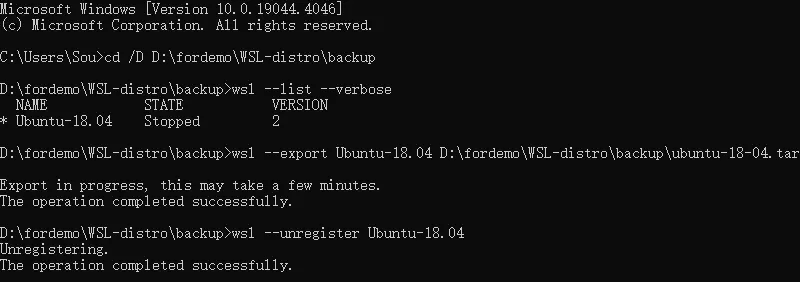
Step 1: Create a folder on your desired drive to save the export file. I created the folder "D:\fordemo\WSL-distro\backup".
Step 2: Open Command Prompt and use the command cd /D D:\fordemo\WSL-distro\backup to switch to this backup folder.
Tips: You can use the "Tab" key to autocomplete commands while typing. Simply type a few characters and press "Tab", and the command will be automatically completed.
Step 3: Use the command wsl --list --verbose to check the state information of distributions.
Step 4: If the distribution hasn't been closed, use the command wsl --terminate Ubuntu-18.04 to terminate it. Replace "Ubuntu-18.04" with the appropriate distribution name.
Step 5: Use the commandwsl --exportUbuntu-18.04 D:\fordemo\WSL-distro\backup\ubuntu-18-04.tarto export the WSL distribution as a tar file. Replace the underlined sections with terms that suit your reality.
Step 6: Use the command wsl --unregister Ubuntu-18.04 to remove it from the original drive. Similarly, replace "Ubuntu-18.04" with the appropriate term. Please note that I won't go into detail after that.
Step 7: Create a folder to store the distribution. In my case, I create the folder "D:\fordemo\WSL-distro\ubuntu-18".
Step 8: Use the command wsl --import Ubuntu-18.04 D:\fordemo\WSL-distro\ubuntu-18 D:\fordemo\WSL-distro\backup\ubuntu-18-04.tar to import the WSL distro into the desired folder.

Step 9: In this situation, the imported distribution will default to using the root user. If you want to change the default user, perform these steps below.
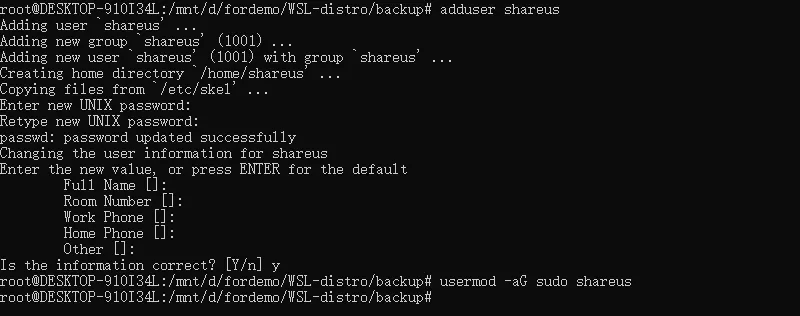
9.1: Use the command adduser yourusername to create a new user.
Optional: Alternatively, you can use the command usermod -aG sudo yourusername to grant the user "sudo" permissions.
9.2: Use the command sudo nano /etc/wsl.conf to modify the "wsl.conf" file for configuring default user.
9.3: Add following contents to this configuration file.[user]default=yourusername
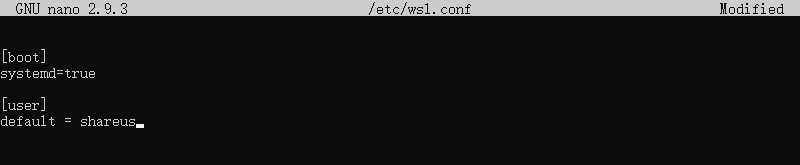
9.4: Press "Ctrl + X" to save and exit editor, press "Y" to confirm the action, and then hit "Enter" to go back to the previous interface.
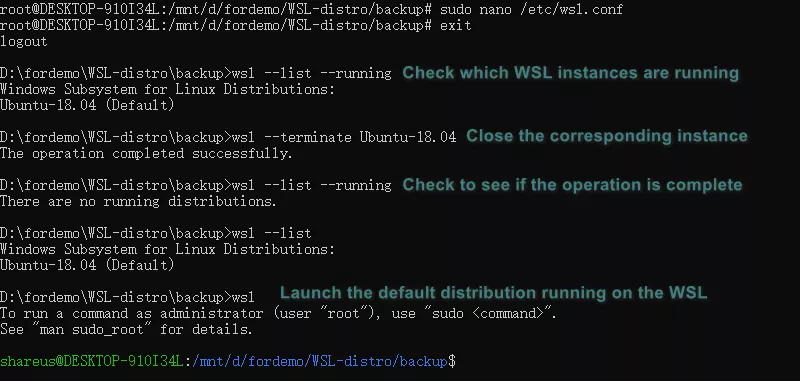
9.5: Enter exit to logout of this distribution.
9.6: Use the command wsl --terminate distro-name to shutdown the distribution.
9.7: Now you can start this distribution as the user you set above.
Note: You can find more methods to set default user in this answer. And if you want to learn more about the "wsl.conf" file, you can see this offical article.
Step 10: All steps are now completed.
Tips: You can choose to delete the tar file in the "backup" folder and the corresponding folder in system drive later.
Conclusion
The first method is undoubtedly the most straightforward and easy. If you prefer a hassle-free approach, it's the perfect choice for you. On the other hand, both the second and third methods require manual configuration of certain parameters. Fortunately, you can smoothly complete this configuration by following the detailed steps provided above.

![[Guest OS: Windows 10/Linux(Ubuntu)] How to Expand VM Disk Space in VMware Workstation](../img/computer/guest-os-windows-10-linux-ubuntu-how-to-expand-vm-disk-space-in-vmware-workstation/guest-os-windows-10-linux-ubuntu-how-to-expand-vm-disk-space-in-vmware-workstation-m.webp)