How to Reclaim Disk Space from Ubuntu on WSL 2

March 29, 2024

The virtual hard disk grows as we use the distribution day by day. Although we have deleted unnecessary files, the space has not changed. Is there a solution to free up this unused space? Of course! In this post, I will introduce three ways to help you reclaim disk space from Ubuntu on WSL 2. Read on.
Way 1: Manually Reclaim Unused Disk Space
There are two methods to manually reclaim unused disk space. One method is suitable for Windows Pro or higher, while the other is a more general approach that can be used on Windows Home. If you use the Windows Home version, please choose the method applicable to it. Here are the steps to manually reclaim unused disk space. Let's delve into them now.
Windows Home or Higher - Use the Compact Option in Diskpart
This way applies to Windows Home or higher versions.
Step 1: Open the Command Prompt as administrator.
Step 2: Enter wsl --shutdown command to terminate all WSL instances.
Step 3: Navigate to the virtual hard disk, ext4.vhdx, and back it up to a safe location in case of unexpected events.
Tips: The location is similar to "%userprofile%\AppData\Local\Packages\CanonicalGroupLimited.xxx\LocalState\".
Step 4: Type diskpart command to access disk partitioning utility.
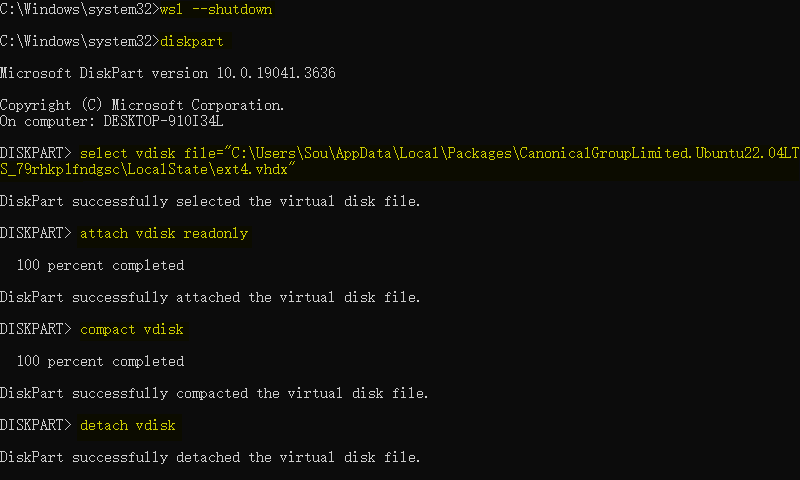
Step 5: Input these commands sequentially and hit "Enter" key after typing each command.
select vdisk file="the path of ext4.vhdx"
attach vdisk readonly
compact vdisk
detach vdisk
exit
Step 6: Execute exit command again to close Command Prompt.
Step 7: The ext4.vhdx will become small now.
Windows Pro or Higher - Use Optimize-VHD in PowerShell
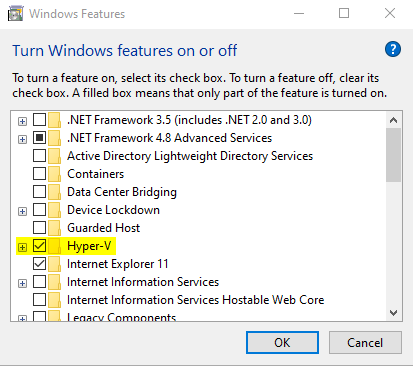
This way is only available on Windows Professional or higher versions with Hyper-V feature installed.
Step 1: Turn on Hyper-V feature.
1.1 Open the "Windows Features" window by searching for "Turn Windows features on or off" in the Windows Search bar.
1.2 Find the Hyper-V and select its check box to turn it on.
1.3 Click "OK" and restart your computer to apply this change.
Step 2: Open Windows PowerShell as administrator by right-clicking Start menu and selecting "Windows PowerShell(Admin)" in the menu.
Step 3: Repeat the step 2 and step 3 in the Windows Home and higher section.
Step 4: Use Optimize-VHD -Path the path of ext4.vhdx -Mode Full to get unused space back.

Tips: You can copy the path of ext4.vhdx by pressing the Shift key and right-clicking the ext4.vhdx file, then select "Copy as path" in the context menu. Remember to remove the quotation marks.
Step 5: Enter exit to close the Windows PowerShell.
Step 6: All steps have been completed now.
Way 2: Reclaim Unused Disk Space by Exporting and Re-Importing
Export the distribution and then re-import it can also reclaim disk space. If the above way is not available, you can give it a try.
Step 1: Copy the path of ext4.vhdx file for later use.
Step 2: Launch the Command Prompt as administrator.
Step 3: Use wsl -l -v command to check the state of WSL instances. If the distribution is running, use wsl --terminate <distroname> command to stop it.
Step 4: Export the distribution using wsl --export <distroname> the path you want to save the backup file. In my case, the path is "C:\Users\Sou\AppData\Local\Packages\CanonicalGroupLimited.Ubuntu22.04LTS_79rhkp1fndgsc\LocalState\backup.tar".
Step 5: Wait for the process to complete. Use wsl --unregister <distroname> to delete this distribution.
Step 6: Enter wsl --import <distroname> <the path you want to save the distribution> <the path of backup file>.
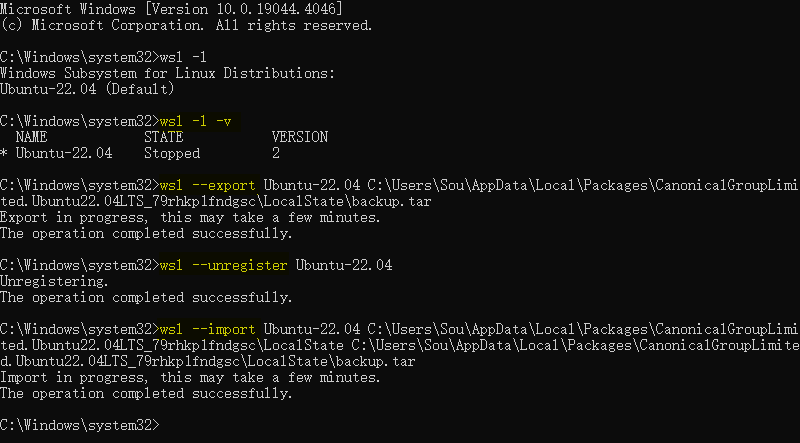
Step 7: Wait for the import to complete. In this way, the distribution will run as root user. If you want to change the user, refer to step 9 in this article.
Way 3: Automatically Clean Up Disk Space by Setting Sparse VHD
It's a bit tedious to always reclaim space manually. Fortunately, Windows Subsystem for Linux provides Sparse VHD feature to solve this problem. Let's take a look.
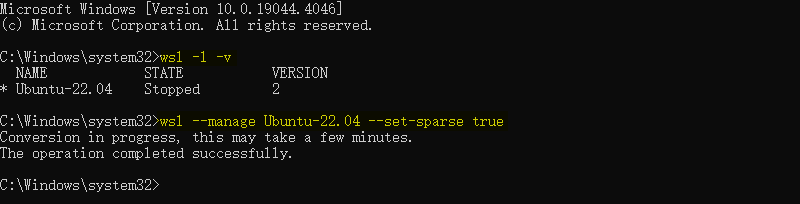
Step 1: Access the Command Prompt as administrator.
Step 2: Use wsl -l -v to view the installed distributions and their state.
Step 3: Use wsl --shutdown to close all WSL instances or wsl --terminate <distro> to stop specified WSL distribution.
Step 4: Use the command wsl --manage <distro> --set-sparse true to set this distro to be sparse.
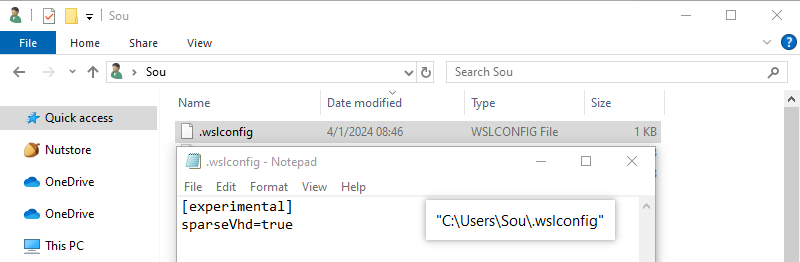
Step 5: If you want to make newly created distributions sparse, you need to create a ".wslconfig" file in the Windows home directory. You can access the home directory by typing "%userprofile%" in the address bar of File Explorer.
Step 6: Edit the ".wslconfig" file and save the following contents in it. [experimental] sparseVhd=true
Step 7: The newly created instances will be sparse now.
Note: In sparse mode, the virtual hard disk will automatically reduce its size, so it may also not change at once.
Conclusion
This article presents three ways to reclaim disk space from Ubuntu on WSL 2. The first way is easy and quick for everyone. The second way is a bit more complex and time-consuming, but it will definitely work. Lastly, there's a new feature for reclaiming disk space automatically that you can give a try. By following the methods outlined in this post, you can easily reclaim unused space.

![[Guest OS: Windows 10/Linux(Ubuntu)] How to Expand VM Disk Space in VMware Workstation](../img/computer/guest-os-windows-10-linux-ubuntu-how-to-expand-vm-disk-space-in-vmware-workstation/guest-os-windows-10-linux-ubuntu-how-to-expand-vm-disk-space-in-vmware-workstation-m.webp)