Efficient Tips for Managing Bookmarks in Google Chrome

March 5, 2024

Bookmarks are a practical feature, allowing us to save and swiftly access our favorite webpages. However, if added randomly, the bookmark bar can become increasingly cluttered over time. Consequently, accessing our desired websites becomes less convenient compared to the initial setup. To restore a user-friendly web experience, it's time to organize your bookmarks. Explore this article to learn efficient tips for managing bookmarks in Google Chrome.
Part 1: Utilize Built-in Bookmark Manager for Efficient Organization
1. Basic Operations
In this section, I will guide you on adding, deleting, and editing bookmarks.
Adding a Bookmark
Step 1: Open the webpage you want to bookmark.
Step 2: Click the star icon or press Ctrl + D.
Step 3: In the popped-up window, select "Edit".
Step 4: Enter a name, choose a folder, and save.
Tip: To select a different folder, opt for "Choose another folder" option if your desired folder is not visible.
Delete a Bookmark
Step 1: Locate the bookmark in the bookmark bar.
Tip 1: Display the bookmark bar by pressing "Ctrl + Shift + B" if it's hidden.
Step 2: Right-click on the bookmark, choose "Delete" from the context menu.
Tip 2: To delete an entire folder, right-click on the folder and select "Delete".
Editing a Bookmark
Follow the steps similar to "Deleting a Bookmark", but select the "Edit" option instead.
These basic operations are essential for maintaining an organized bookmark bar. Mastering them will help keep your bookmarks tidy and easily accessible.
2. Advanced Tips
Google Chrome offers a built-in Bookmark manager to efficiently organize your bookmarks. We will explore its functionality in the upcoming section.
To open the Bookmark Manager
Utilize the keyboard shortcut "Ctrl + Shift + O". Alternatively, access it by clicking the three dots icon in the top-right corner, navigating to "Bookmarks and lists," and selecting "Bookmark manager".
Search Feature
Step 1: Click the search icon to initiate a search.
Step 2: Type a keyword to locate relevant bookmarks.
Note: The search includes both the Name and URL fields of the bookmark.
Step 3: Select the bookmarks you wish to manage, then right-click.
Step 4: From the context menu, choose the appropriate option to perform the desired operation.
Adding a Folder
Step 1: Navigate to the folder under which you want to create a new subfolder.
Note: The "Bookmarks bar" serves as the root folder, and "Other bookmarks" appears to the right of the address bar after adding a bookmark to it.
Step 2: On the current page, click the three dots and choose "Add new folder" to create a new folder.
Pro Tip: Enhance your folder's name with unique symbols. Find a variety of symbols at getemoji.com, copy and paste them into the Name field. Alternatively, use Microsoft's built-in emoji by pressing "Windows logo + period(.)".

Export Bookmarks:
Step 1: Follow the previously mentioned Step 2, and opt for the "Export bookmarks" option.
Step 2: Select the suitable location to store the exported bookmarks in the popped-up window.
Note: This file can be opened directly in the browser and utilized for future importing bookmarks.
Import Bookmarks
There are two methods for importing bookmarks. One involves using the Bookmark Manager, following similar steps as exporting bookmarks. The other method utilizes the "Import bookmarks and settings" feature, which I will guide you through.
Step 1: Click the three dots in the top-right corner of the browser.
Step 2: Hover over the "Bookmarks and lists" option, then select "Import bookmarks and settings".
Step 3: In the popped-up window, choose the import source from Microsoft Internet Explorer, Mozilla Firefox, or a Bookmarks HTML file in the drop-down menu.
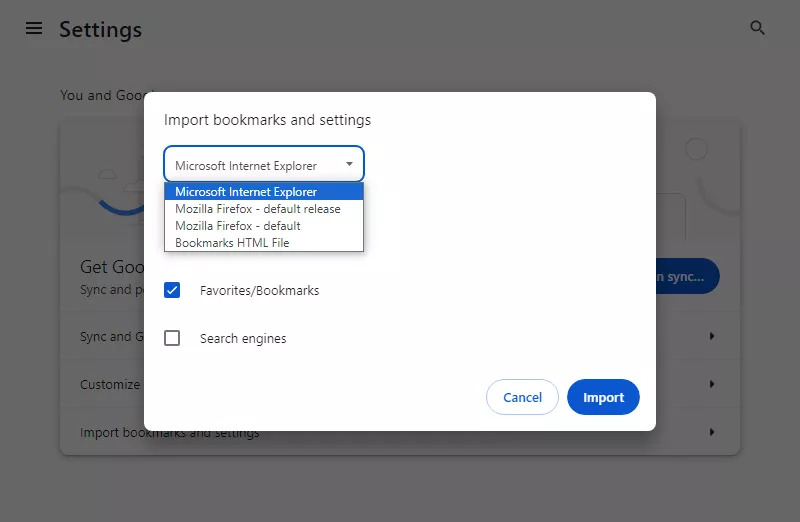
Tip: Remember to close the corresponding browser before clicking the Import button.
Other Features
In addition, you have the flexibility to freely drag and drop bookmarks and folders within the Bookmark Manager, making it effortless to organize your bookmarks.
Furthermore, utilize the "Sort by name" option to arrange bookmarks in alphabetical order, facilitating easy navigation. Note that this option will only impact the order of contents displayed on the current page of the Bookmark Manager.
Part 2: Explore Handy Extensions for Effortless Bookmark Management
1. Dead Link and Duplicate Link Cleanup Extension
Over time, some of the links we save may become invalid, making regular cleanup essential for maintaining the tidiness and health of your bookmarks. Admittedly, we could inspect them individually by clicking one by one. However, envision having 100 or more bookmarks – that would be quite overwhelming.
Moreover, duplicates may also find their way into your bookmarks, adding to the complexity of organization. In such cases, employing a practical tool becomes the preferred choice. In the next section, I'll introduce an extension that can efficiently assist you in cleaning up both dead links and duplicates. Let's explore it together.
Caution: Ensure you back up your bookmarks before cleaning up dead links to facilitate potential recovery needs.
First, install the Bookmarks clean up extension and access it by clicking the extension icon.
Clean Up Duplicate Links
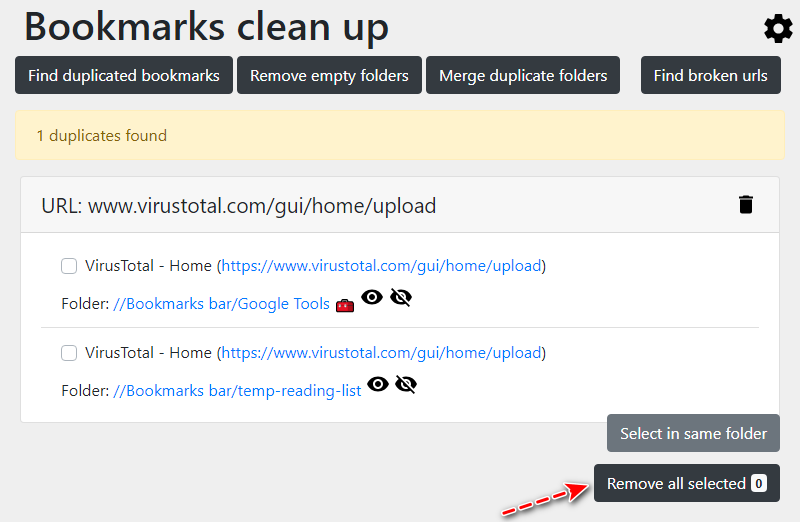
Step 1: Select "Find duplicated bookmarks" option to identify and eliminate duplicates.
Step 2: Review the displayed duplicates and choose the ones you wish to remove.
Step 3: Click "Remove all selected" in the bottom-right corner to complete the deletion process.
Clean Up Dead Links
Step 1: Click the gear icon to configure parameters based on your preferences.
Note: If you are not familiar with this, keeping the default settings is perfectly fine.
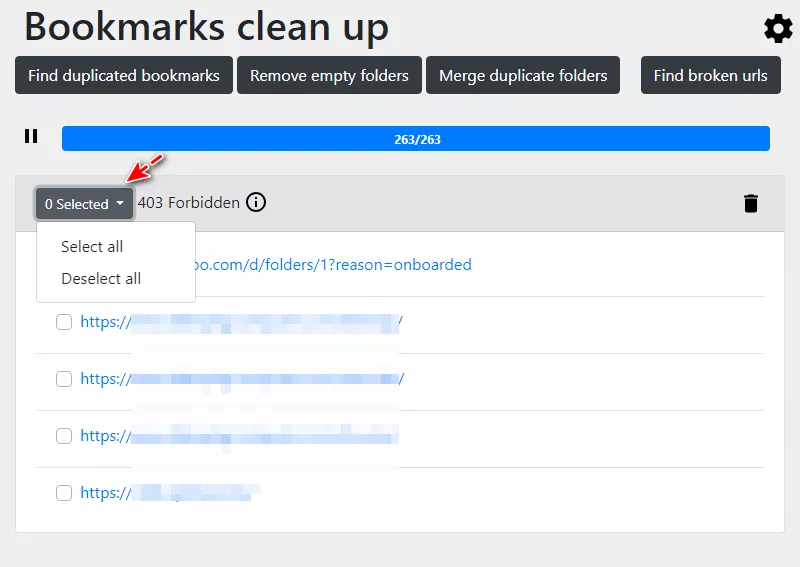
Step 2: Click "Find broken urls" and select "Allow" to grant necessary permissions.
Step 3: Wait for the process to complete.
Step 4: Review the results and manually check a few sites to verify accuracy.
Step 5: Select the links you wish to delete and click the trash icon to remove them.
Pro Tip: Utilize the "Select all" option in the top-left drop-down menu for efficient batch selection.
2. Advanced Bookmark Management Extension
In this section, I'll introduce Raindrop, an advanced bookmark manager known for its powerful features.
Raindrop is available as an extension on Google Chrome, Edge, Firefox, and Safari, with web and native apps for mainstream platforms. Its wide support ensures seamless access to your bookmarks across all your devices. It's worth noting that bookmarks will be saved in Raindrop, not in the Chrome Bookmark bar.
Next, I'll provide a brief overview of its Chrome extension.
Step 1: Install the Raindrop.io extension.
Step 2: Click the icon to perform the initial configuration.
Step 3: Sign up for an account or log in if you already have one.
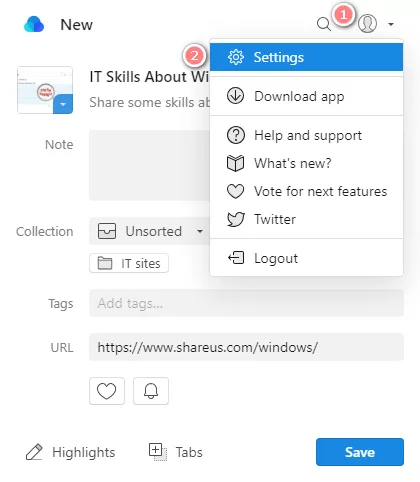
Step 4: Navigate to the desired page and click the Raindrop.io icon.
Step 5: Edit the bookmark in the opened window.
Tip: Create a new folder by typing the folder name directly in the "Find or create a new collection" section.

Caution: The default display mode is Clipper; you can change it in the Settings. Clipper mode is suitable for adding bookmarks, while Mini app mode is better for managing bookmarks.
It is worth mentioning that Raindrop possesses powerful management capabilities, and you can explore them further.
Raindrop excels in syncing content across all your devices. Give it a try now if you need seamless access and management across different platforms.
Conclusion
In this article, we present effective tips for efficient bookmark management and introduce some outstanding extensions to help you conveniently organize your favorites. By tailoring these features to your preferences, you can navigate your bookmarks effortlessly, ensuring a streamlined and enjoyable browsing journey.