Full Fix: Unspecified Error When Copying A File or Folder in Windows 11/10

June 24, 2022
Transferring files or folders from one drive to another should be very easy and trouble-free, but some users have reported that they encountered unspecified error message when they are trying to copy and paste the files or folders from one disk to a different one. Not being able to copy-paste is depressing, especially if the files you want to copy are very significant to you. If you are also striving to find the solutions, this post is for you. Here are some available solutions on how to fix "Error Copying File or Folder: Unspecified error".
- Part 1: Possible reasons for unspecified error
- Part 2: How to fix unspecified error
- Fix 1: Compress the file or folder
- Fix 2: Re-register jscript.dll & vbscript.dll using cmd
- Fix 3: Change the ownership of the file or folder
- Fix 4: Change the destination format type to NTFS
- Fix 5: Remove read-only status from destination drive
Part 1: Possible reasons for unspecified error
- System limitation.
- There exists conflicting applications.
- Target disk corruption error.
- Insufficient space on the target partition.
- The destination drive is read-only or write-protected.
- The copied files are larger than 4 GB.
- The copied files are encrypted.
- The ownership of files or folder has been changed.
Part 2: How to fix unspecified error
Before performing the following fixes, try rebooting your device and check if you can copy and paste files or folders after restarting. Or you can temporarily disable antivirus programs or applications and then transfer again. If these two basic workarounds won't work, move to the below solutions.
1. Compress the file or folder
Step 1: Right-click on the file or folder that you want to transfer.
Step 2: Select Send to>Compressed folder. This would reduce the file size.

Step 3: Copy the zipped file or folder and check if the error message appears again.
2. Re-register jscript.dll & vbscript.dll using cmd
Step 1: Type and search cmd in the search bar and select Run as administrator.

Step 2: In the Command Prompt window, enter these commands one by one and hit Enter to launch each of them.
regsvr32 jscript.dll
regsvr32 vbscript.dll
Step 3: After the commands are completed, restart your system.
3. Change the ownership of the file or folder
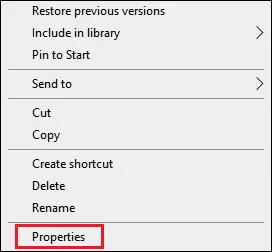
Step 1: Right-click on the specific file or folder and choose Properties at the bottom of the context menu.
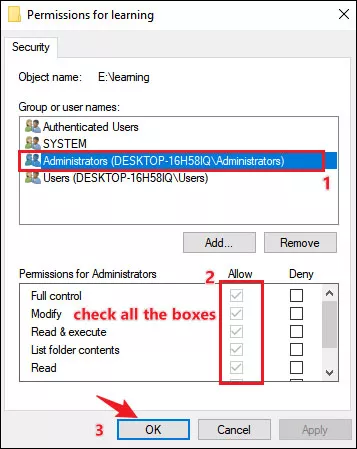
Step 2: In properties window, choose Security tab and click the Edit option.
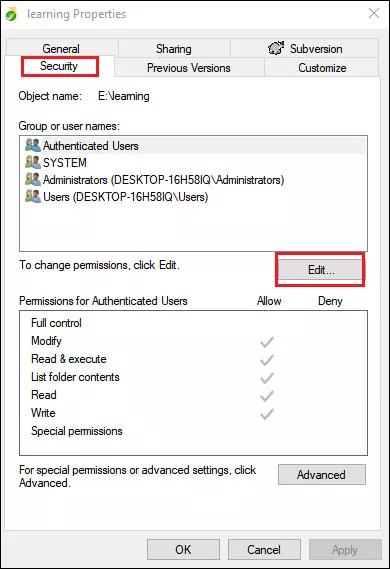
Step 3: In Security window, select Administrative account from Group or user names section and make sure all the boxes are checked in the Permissions for Administrators section. Then, click OK.
Step 4: If you are unable to edit the permissions, click on Add button.
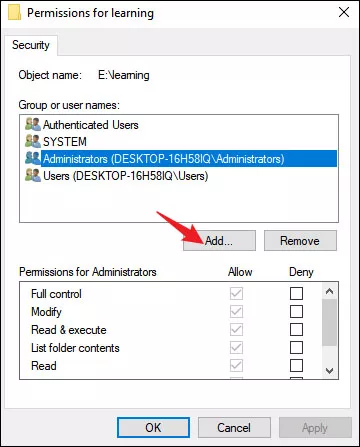
Step 5: In Select Users or Groups window, enter everyone in the text box and click OK.

Step 6: Then select Everyone and check Full control and Modify. Finally, click Apply and OK.

4. Change the destination format type to NTFS
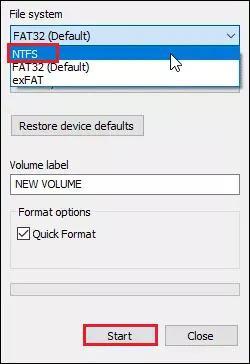
Note: Formatting the drive will delete all files and folders. If there are important files in the target drive, create a backup of the important files when applying this method.
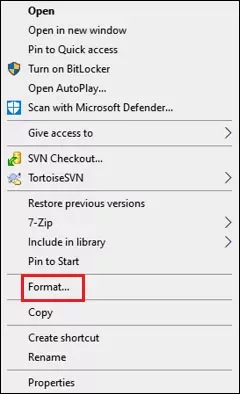
Step 1: Right-click on the target drive and choose Format.
Step 2: Select NTFS under the File system option and click Start.
Step 3: Then click Close to finish formatting and reboot your PC.
5. Remove read-only status from destination drive
Step 1: Open Command Prompt as administrator.
Step 2: Copy and paste following commands one by one and press Enter to execute each one.
diskpart
list volume
select volume X
attributes disk clear readonly
Note: X stands for the drive letter.
Step 3: Restart your computer to apply the changes. This would change the status of your write-protected drive.