What to do If My Graphics Card Fans Keep Turning On and Off

August 25, 2022
The primary function of a graphics card fan is to dissipate heat, bringing air from outside the card into the hot fins, which then carry away the waste heat generated by operation. If there is a fault with the fans and thus the cooling gets affected, it will downgrade the performance of the graphics card. Some users have reported that they notice a strange phenomenon when observing their graphics cards, where the fans repeatedly spin for a period of time and then stop. This issue may occur at startup or while gaming and the time interval between turning on and stopping is not always regular either. In this post, we will discuss the possible causes and solutions to graphics card fans turning on and then off.
Should the graphics card fans keep running all the time?
Whether the fans will keep spinning depends on the brand and quality of your graphics card. Generally, medium or high-end graphics card fans do not spin all the time as the fans will only spin if the graphics cards reach a certain temperature, usually 60 degrees. For the purpose of providing a better experience for users, some graphics cards will also stop the fan under light loads to reduce noise. But a low-end graphics card’s fan is always spinning, which runs in a low speed when the temperature is not high and runs in full speed under high temperature.
To check if your graphics card fans stop spinning because it’s idle, you can observe the fan speed curve.
Step 1: Download MSI Afterburner from the official website.
Step 2: Click the curve icon at the left side to observe detailed data for each parameter.
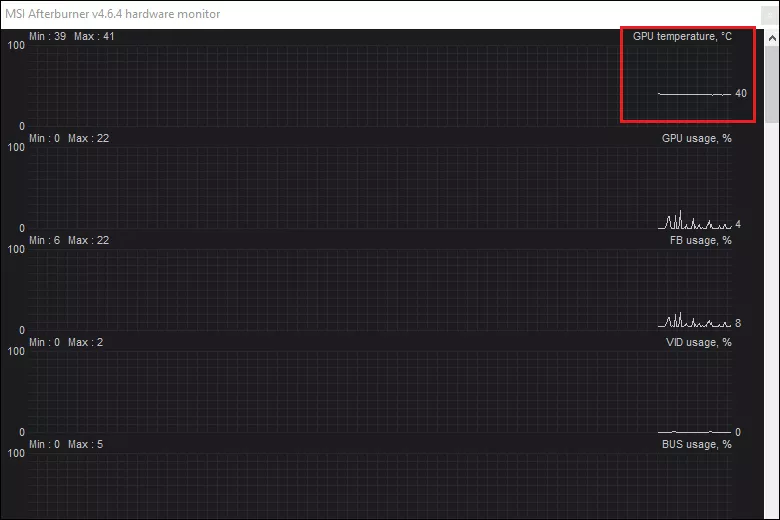
Step 3: Check the GPU temperature curve.
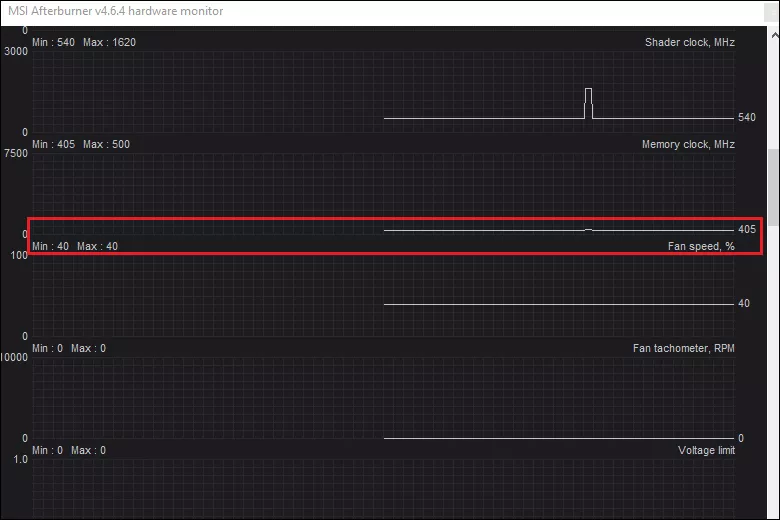
Step 4: Scroll down to check the fan speed curve. This curve should be in accordance with the temperature curve and it won’t have any spikes when not in high temperature.
Why the graphics card fans keep restarting spinning?
- The graphics card features a technology that automatically stops spinning its fans.
Some graphics cards are functioned with self-temperature control, which means that their fan’s speed is automatically adjusted in such a way that the fan will not spin when the graphics card does not reach 60 degrees.(the temperature threshold for fans to start working varys) Therefore, you will encounter the problem while the graphics card is not under heavy load and its temperature is just around the threshold temperature where the fan stops and starts spinning. If the temperature exceeds the threshold value, the fan spins for a while and stops when the temperature drops. In such cases, you have no need to worry.
- Too much dust on the fan causing the fan controller not functioning properly. With heavy dust, it can gather near the outlet, making internal heat dissipation difficult and increasing power consumption of the graphics card.
- The external power cable for the graphics card is loose.
- Your PSU is too weak. The fans cannot keep running when the PSU fails to supply enough power to the graphics card.
- The RAM or CMOS battery may be loose.
How to get the fans back to work?
1. Customize the fan curve
This can be easily done with MSI Afterburner.
Step 1: Click the settings icon at the left side.
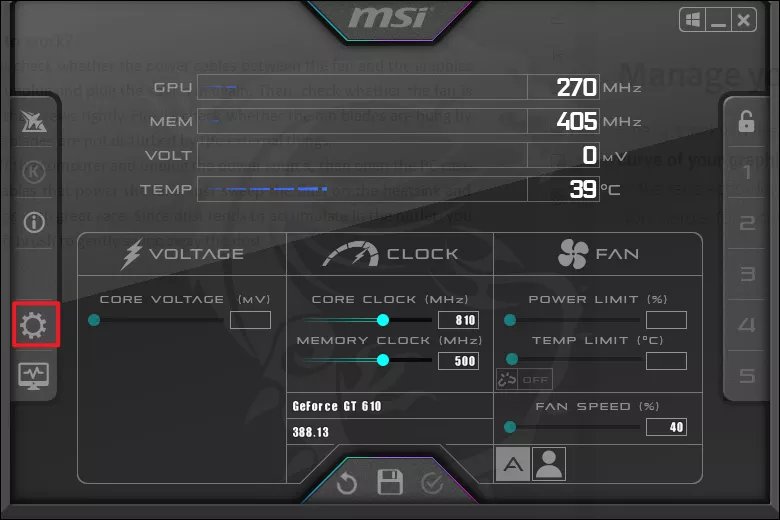
Step 2: Choose Fan tab and check Enable user defined software automatic fan control.
Step 3: You can control the fan speeds and customize the temperature at which the fan will start working by adding points on the curve. Make sure Custom is selected in fan speed curve section.
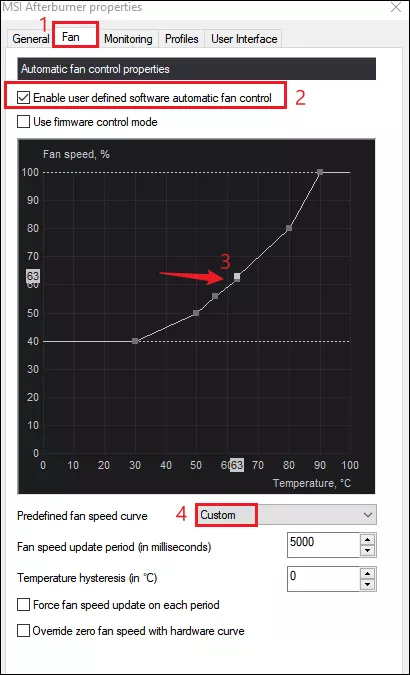
Step 4: Click Apply and OK.
2. Check the fan itself
Firstly, check whether the power pins between the fan and the graphics card is connected properly. It’s better to unplug and plug the cables in again. Also, you can try using other PCI-E lanes in your board to see if it makes a difference. Then, check whether the fan is fixed firmly. If it is not, twist the screws tightly. Finally, check whether the fan blades are hung by something to ensure that the blades are not disturbed by the external things.
3. Clean up the dust
Turn off the computer and unplug the power source, then open the PC case. Make sure you unplug the cables that power the fans. Just sweep the dust on the heatsink and fans, then swab the small gaps with great care. Since dust tends to accumulate in the outlet, you need to work with a small soft brush to gently swipe away the dust.
4. Check the PSU
Find out how much power your graphics card needs by searching for its model, you need to make sure the power supply is meeting the minimum power consumption. To verify if your PSU provides enough power for computer components, you can put your graphics card in another computer and check whether the fan spins normally. Or just test the PSU with a software like OCCT.
5. Reinstall the CMOS battery and the RAM modules
Open your PC case after unplugging the power cable. Find out the small lithium CMOS battery on your motherboard and remove it. Then reinsert the battery and make sure it won't come loose. Next, take out the RAM modules. There are two slots on the motherboard in which the RAM sticks are inserted. You will need to pivot the two ends of the tabs, pinch the top of the RAM stick with your hand and pull it out carefully, without touching the cables or sockets on the sides. Place a piece of white paper on the table and place the RAM stick on it. Gently wipe the yellow metal part of the RAM stick with an eraser to remove the dust and dirt. Please note that RAM sticks are afraid of water, grease, dust and electrostatic and should be handled with extra care. Once the memory stick is wiped clean, it has to be re-installed in the slot, re-inserted, plugged in tightly and stuck on the safety pins.