5 Ways to Fix after Windows System Clone Can Not Boot From New Disk

January 23, 2024
After cloning the system, the computer cannot boot from the new hard drive. If this issue is not handled properly, it can consume a significant amount of time, causing frustration, and preventing us from working or playing games. Now, we will provide you with 5 ways to fix after Windows system clone cannot boot from new disk!
1. Remove the Old Drive, Install the New One
Shutdown the computer, remove the old system hard drive, install the new system hard drive, and then power on the computer. The computer may now be able to enter the system.
When initially using the new hard drive to access the system, it's advisable not to have both hard drives coexisting. As for the reason, it's because the motherboard will automatically locate the appropriate hard drive and boot from it.
If the above methods are ineffective for you, you might want to take a look at the following one. It can resolve the majority of issues.
2. Use Bcdedit Command to Fix the Problem
What is BCD? It means the Boot Configuration Data. When Windows is running, the BCD file will instruct the Windows Boot Loader on where to locate the boot information.
Get it ready for booting with DiskPart. DiskPart is a command-line Windows utility with which users can manage disks, partitions, and volumes. Here's how to do it:
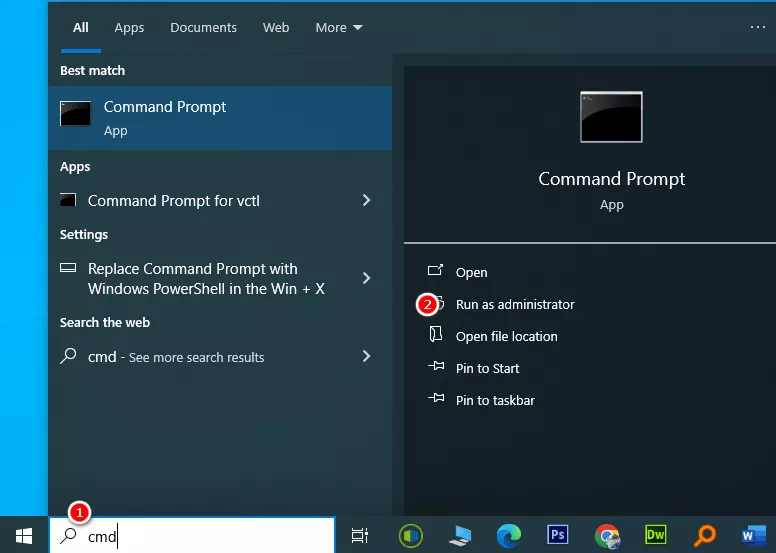
Step 1: Run Command Prompt as Administrator & Use Diskpart Command.
diskpart -- list disk -- list vol -- exit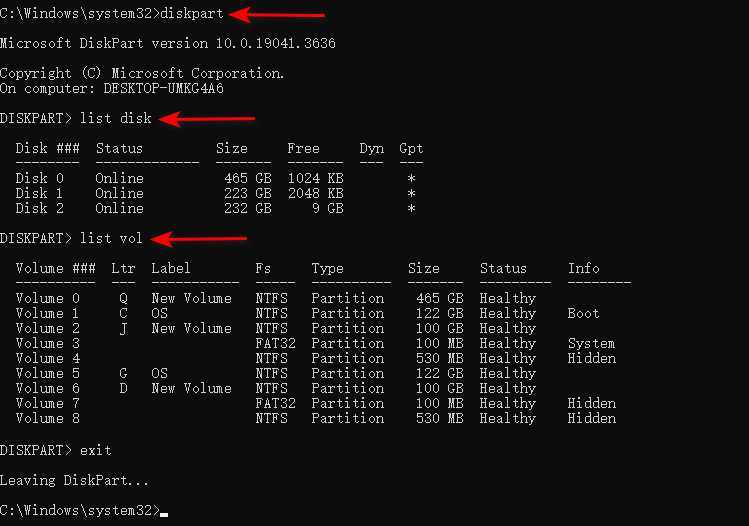
Step 2: Use Command BCDEDIT.
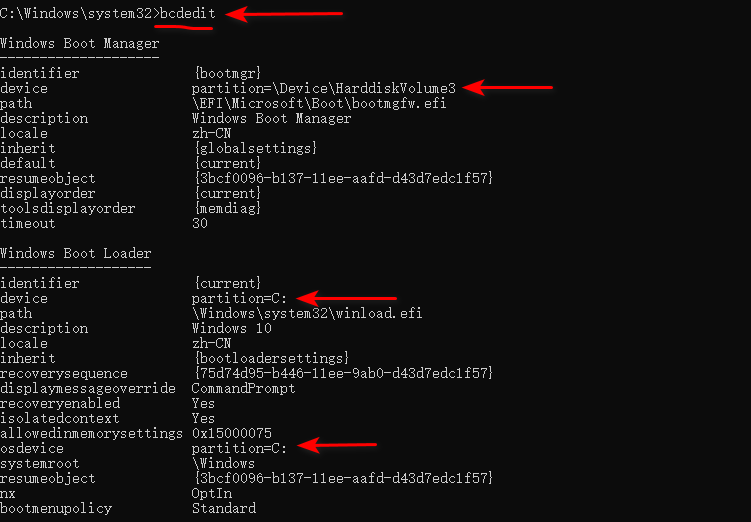
When using bcdedit as an administrator, startup item configuration information will be displayed.
As you can see, those highlighted with red arrows will be our focal points because later we will need to configure them for changing system boot options.
How to identify which disks the diskpart commands' disk numbers represent in your computer, as well as the volumes listed under the 'list vol' command? It's straightforward. The disks obtained from 'list disk' can be differentiated based on their capacities.
The nine volumes obtained from 'list vol' can be considered as representing all three disks from a partition perspective. You can distinguish them using information such as Ltr, Label, Fs, Size, Info, and so on.
Explanation:
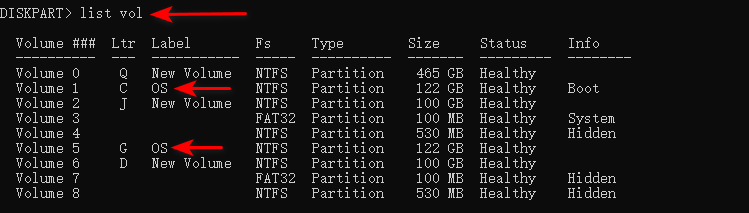
In the 'Label' column, volumes labeled with "OS" are the system partitions. As you can see in the image, there are two system partitions labeled C and G. This is because these are the cloned disks after system cloning. There are also two volumes with Fs=FAT32, namely volume3 and volume7, both with a size of 100MB. Volume3 has the value: Info=System, indicating that volume3 is the EFI partition at this moment. And volume7 can be set as EFI partition for booting.
Judging by the capacity, volumes 1, 2, 3, and 4 correspond to volumes 5, 6, 7, and 8, respectively. Combining this with the 'list disk' command, volumes 1, 2, 3, and 4 belong to disk1, while volumes 5, 6, 7, and 8 belong to another disk2, and volume 0 corresponds to disk0.
Step 3: Use Bcdedit /set Command.
To modify the location where the boot manager looks for guidance files during startup, use the following commands. Keep in mind that the drive letters provided are not absolute and should be written based on the drive letters shown in the diskpart command above.
bcdedit  /set {bootmgr} device partition=\Device\HarddiskVolumeX
bcdedit  /set {current} device partition=Y:
bcdedit /set {current} osdevice partition=Y:
Replace X: with the actual volume number where the EFI partition is located, and replace Y: with the drive letter corresponding to the partition where your operating system is installed.
These commands adjust the boot configuration data (BCD) to point to the correct locations for boot files. If you can't find {current}, use {default} instead.
Here are the operations photos:

Generally, if there are no errors, restarting the computer should allow it to boot from the new hard drive.
3. Reclone Using a Better Cloning Tool CloneGo
Reclone using a better cloning tool—our CloneGo Professional Cloning Software. With a simple interface and fewer operation steps, it ensures easy booting after successful cloning. You can clone either the entire disk or specific partitions, and it also supports secure backup and restore functions. To view the complete cloning tutorial: How to Migrate Your OS to a New SSD without Data Loss
4. Use Windows RE to Repair EFI Boot
The above content feels too complicated, is there a simpler way? Yes.
You can try the following methods: when clicking the restart option, hold down the Shift button to enter the repair mode. Navigate to Troubleshoot -> Advanced options -> Startup Repair.
If it doesn't work, you can choose Command Prompt to try fixing the boot issue of the cloned hard drive using Bootrec.exe command. Enter the following commands sequentially and press "Enter" after each one.
bootrec.exe /fixmbr
bootrec.exe /fixboot
bootrec.exe /scanos
bootrec.exe /rebuildbcd
5. Use Bcdboot Command to Rebuild the EFI Partition
Step 1: Prepare a Bootable USB Flash Disk & Boot from the Drive.
If you are unsure what a system installation disk is and how to operate it, please read: Copy System to a New Hard Drive Without Using Third Party Software Step by Step. Learn the part 1: Creating a System Bootable Disk Using a USB Drive
Step 2: Use the Command Below.
Check if your actions match those in the image. Drive letters and volume numbers need to be determined based on your actual computer situation and should not be applied rigidly.
Insert the USB flash disk, Reboot your computer from USB, Repair your computer, Troubleshoot, Command Prompt.
diskpart -- list disk -- list vol -- select disk X -- list part
list vol -- select volume Y -- assign letter=K --exit
bcdboot C:\Windows /s K: /s UEFI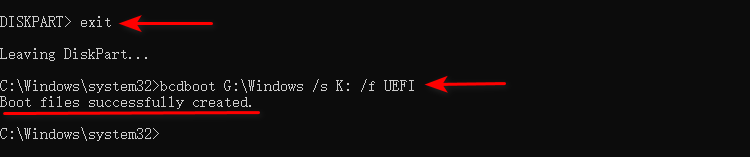
After completing all the operations, you can remove the USB drive and restart the computer to check if the issue has been resolved.